Hi and welcome to Day 5 of our Black and White Magic online class.
Again a great array of images being posted on Facebook. For those of you who do not want to use Facebook, you can post your images to your Flickr account, blog or web page, if you have one, and send me a link or just email me your pictures. I know Facebook is not everyone’s cup of tea. So I am happy to work around for you.
Today’s post processing tutorial will look at using the Black and White Adjustment layers for converting an image to Black and White. Unfortunately this is not a Black and White conversion option that is available for Elements users so the first video is for Photoshop users and the second video will address a similar conversion method for Photoshop Elements users.
Your PDF and Class Files can be downloaded HERE
PHOTOSHOP VERSION
ELEMENTS VERSION
.png) TECH TALK
TECH TALK
Today we are going to talk about Shutter Speed. Shutter Speed is one of the three exposure controls that we adjust when shooting pictures. Luckily it is the easiest to understand. Shutter Speed simply refers to the amount of time the shutter is left open for light to come in and hit the sensor on your digital camera (or film if you shoot it).
When one is describing the technical setting of a picture, you note the shutter speed in seconds – written as 3 or 1/100 or 1/60. Inside the camera view finder you’ll sometimes find a shorter form of display where the “1/” is assumed and only 100 or 60 will display. In that case, when you are setting the camera for one second or more you’ll see two small lines next to the shutter speed setting: 2“. To sum it up, 1/100 is like 100 and is faster the 1/60 (or 60); both are faster than 30″.
The next question that pops to mind is “What shutter speed do I need to use?” The answer to this is both simple yet complex, and mostly depends on what kind of image you are shooting. The following few points will help you to determine the right shutter speed for your picture:
 Am I shooting a still or moving object? If you want to freeze action or your object and have it look sharp, you will need to determine its speed. The faster your subject moves, the faster you need to set your shutter speed. If your subject is moving toward/away from you, its speed has less effect then if it is moving from side to side.
Example 1. The Polo ponies. In order to stop the motion of the horses I wanted to choose a fast shutter speed. This shot was taken at f5.6 1/640sec iso 125. I also chose an aperture that would keep the focus on the horses but was shallow enough to blur the background and 1/640th sec was as fast as I could get without increasing my ISO.
What focal length (zoom) are you using? So, focal length effects something called blur. Blur is the name for those fuzzy images you see when your hand is moving while the shutter is open. The longer the shutter is open the steadier your hand should be to avoid blur. The rule of thumb is that the shutter speed should be 1/[Focal Length]. So if you are shooting with a 500mm lens, you should set your shutter speed to 1/500 or higher. If you are using a DSLR that has a crop factor you have to multiply by the crop factor. For example most Nikon SLRs has a 1.5 crop factor – for the example above you will to set the shutter speed to 1/(500*1.5) = 1/750.
 Am I using a tripod or an Image stabilizer? Both a Tripod and an image stabilizer will help you reduce or even eliminate blur. When using a tripod, you can set your shutter speed to virtually anything. A good image stabilizer will let you set a shutter speed about eight times slower than the rule of thumb previously mentioned. Another option to reduce camera share is to use a cable release to prevent you jostling the camera when you press the shutter button.
At what point do you need to shoot with a tripod? Usually you can hand hold a camera successfully down to about 1/60th of a second. If I am happy and relaxed, and not had too much coffee, I can hand hold my camera down to about 1/40th of a second. But this varies from person to person.
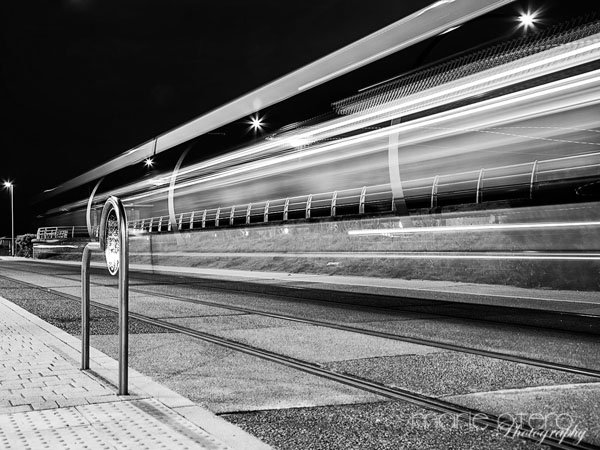
Example 2. Blackpool Night Train. This image was shot at f/10 10sec iso 100 using a tripod. I wanted a good depth of field and since I was shooting at night and wanted to capture the movement of the train shot a really long 10 second exposure which helped me to record all of the train’s motion blur.
.png)
Shooting Assignment #5
Have some fun, experiment and play with shooting images at various shutter speeds.
You can either set your camera on Shutter Priority – This is Tv (Time Value) on Canon cameras and S on Nikons. If you choose to shoot in Shutter Priority, the camera will automatically set your aperture according to your ISO settings…
OR you can be shooting in Manual Mode and adjust your aperture and iso settings manually to achieve your correct exposure to match the shutter speed you have chosen.
Have a go at standing on a street corner and shoot some passing traffic at a high shutter speed to freeze the action. Then drop your shutter speed down as low as you can manage to see if you can;t capture some motion blur!
Zoom zoom…………………..