Black and White Magic Day 9
Hi and welcome to Day 9 of our Black and White Magic online class.
Yesterday we looked further at toning and creating vignettes. The final step in any image post processing is to Sharpen.
So what is Sharpening?
What we think of as sharpness is actually the contrast we see between different colors. A quick transition from black to white looks sharp. A gradual transition from black to gray to white looks blurry.
So when you look at the picture you just shot of that sharp black & white edge, the gray pixels along the edge will make the photo look blurry.
So, sharpening your picture increases the contrast along the edges where different colors meet. This tricks the eye into believing that the photo looks sharper, better, stronger.
Some things to remember about Sharpening…– You can’t add detail that wasn’t already there. If the image was out-of-focus to begin with, sharpening won’t help. Sorry!!
– Sharpening should be the VERY LAST step in your editing process. Crop, make all your color adjustments, mess with the contrast, resize. THEN do your sharpening and preferably do it on a composite or layer copy.
– When you’re sharpening, view your images at either 100% or 50%. These are the two magnifications that will represent your pixel data most accurately.
– If you plan to print your images bear in mind that printers and monitors are based on different technology, so you’ll always see things differently in print than you will on the monitor. If you’re planning to print, the monitor will help get you into the right ballpark. – – You’ll still need to make a test print, though, before you set your final sharpness levels because in likelihood you will need some extra sharpening for the printed image.
PDF and SAMPLE FILES FOR TODAY CAN BE DOWNLOADED HERE
.png)
TECH TALK.
In our last Tech Talk session will touch BRIEFLY on using Filters with your camera. This an extensive subject and worthy of more than a paragraph or two, so I suggest you put the subject on your reading list for further investigation on your own. I did want to briefly touch on the use of filters here though, as using both Circular Polarizing Filters or ND (Neutral Density) Filters can have enormous impact on your photography and particularly when making Black and White conversions.
POLARIZING FILTERS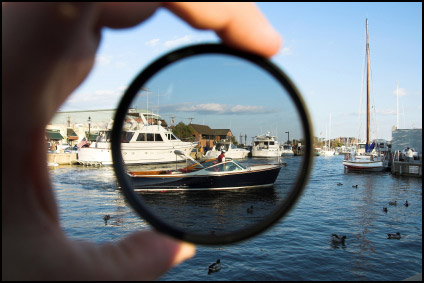 Polarising filters change the way that your camera sees and treats light. Particularly – when using one you’ll notice a change in how your camera sees reflections and glare. As a result it also has the ability to change the vibrancy of some colors in shots.
It has the propensity for creating brilliant skies which translate well into BW. By rotating the circular polarizer _which rotates from dark to light, you’ll see a blue sky change from a light pale blue color to a vibrant and deep blue color (depending upon where the sun is). A polarising filter can cut out a lot of the smoggy haze that is often in city shots too.
And if you are big in to City and Architecture photography shooting through glass can be a real challenge – using a polarising filter can definitely assist in cutting down distracting reflections or glare and enable you to get the dramatic light you would be looking for.
Polarizing filters do change the exposure needed by your camera as it sort of works like putting a pair of sunglasses over your lens. As a result, you will need to manage the numbers in your MAGIC Triangle!! And don’t forget to take it off again at night…… you won’t need a polarizer filter then!
 Shot with a Circular Polarizing Filter to give the blue sky more drama.
NEUTRAL DENSITY FILTERS
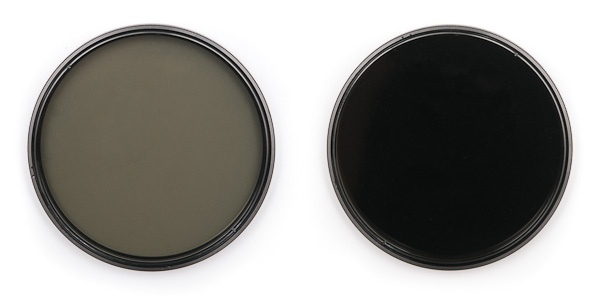 The purpose of a neutral density filter is to reduce the amount of light entering the lens. Doing so allows the photographer to select combinations of aperture, exposure time and sensor sensitivity which would otherwise produce overexposed pictures. It could loosely be described as a dark blob of glass that you add to cover your lens and reduce the light getting to your sensor!
This is done to achieve effects such as a shallower depth of field and most commonly to create a high degree of motion blur such as that you see in those glorious waterfall images and beautifully smooth seascapes.
By using an ND filter you can extend the amount of time your camera is exposing a shot considerably. By how much depends on what strength ND filter you are using. They are normally purchased in F-stop increments, 1 – 8 and they are usually stackable making it possible to shoot during bright daylight for many minutes for creative effect.
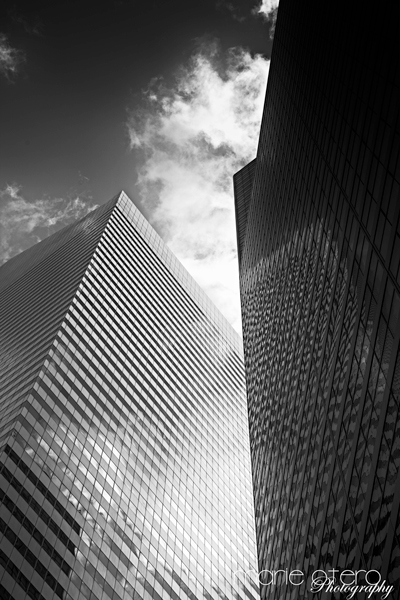
 Using a 6 stop ND filter I was able to shoot this scene across the Hudson River in NYC for THREE minutes in the middle of the day.
.png)
SHOOTING ASSIGNMENT #9
If you have either an ND Filter or Circular Polarizer, have a go at shooting something with it mounted on you camera. Have a look at the difference the filter makes, before and after pics if you have them!!!
If you don’t have either of the gadgets above, then just take your camera for a walk and take me a picture of your day!!